Quick Panel Layout
GENERALLY STARTS WITH A STORY AND A ROUGH LAYOUT
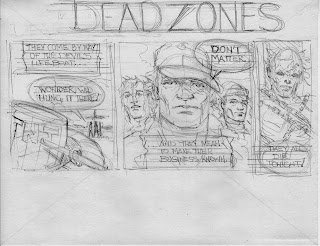
I got the idea to layout a quick panel story the other day ( DEADZONES ). In my opinion it could possibly be an on going series. Who knows? But, this is normally how I start off. After I've figured out how the story and panels are going to flow, I loosely lay everything out by staging each panel with elements best suited to help tell the story.
ADDING DIALOG

It has been many years since I've done traditional lettering. Needless to say more practice is evident. When lettering either digitally or traditionally, one of the things I like to keep in mind is placement. I think that the positioning of dialog can either make - break the intent of a comic book page. At this point, your layout should be taking shape.
ADDING PANEL BORDERS, DIALOG BALLOONS AND POINTERS

I think one of the best ways to achieve good panel flow is communication through panels. Making sure pointers are effectively placed to whomever is speaking. Everything has to be relative within the panel layout in order to convey sound storytelling and keep your viewers attention.
FINALIZING IT WITH INKS

I like to refer to this stage as the home stretch. At this point you are defining your pencil lines with more character and more intensity. Your positive and negative spaces are more prevalent. Once you have completed the inking process it's time to clean up unnecessary ( Pencil ) line work with a kneaded eraser. Later, I will post all the tools I used to create this comic strip.

Comments
Post a Comment